
How Far from the Wall Should Recessed Lights Be to Avoid Harsh Shadow Halos?
Determining how far from the wall should recessed lights be to avoid harsh shadow halos requires a balance between geometry and beam spread. If you position fixtures too close to a vertical surface, you inevitably create intense scallops of light and dark, which distract the eye and highlight wall imperfections.
By pulling the lights away from the perimeter, you allow the beam to disperse more effectively, creating a smoother transition of illumination. Understanding these spatial relationships is essential for anyone aiming to create even ambient lighting without the jagged, high-contrast artifacts that often plague poorly planned ceiling layouts.
The Optimal Distance for Wall Clearance

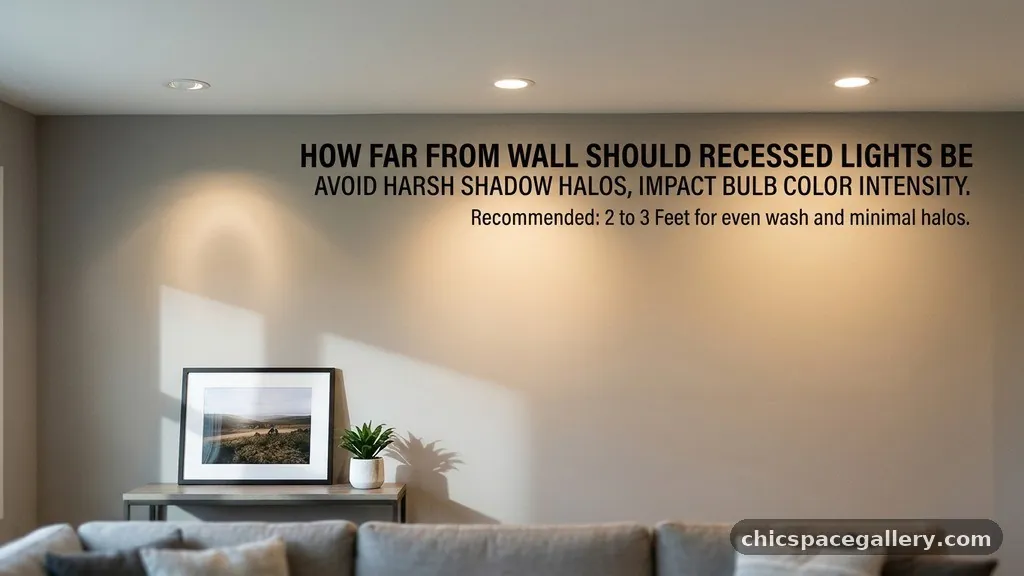
To avoid harsh shadow halos, the standard industry recommendation is to place recessed lights between 24 and 36 inches from the wall. This distance allows the light cone to hit the wall at an angle that promotes even distribution rather than a sharp, truncated arc. If you place a fixture closer than 18 inches, you are almost guaranteed to produce a high-intensity scallop that draws attention to every bump or texture in your drywall.
When you move the light further away, the beam spread has more room to overlap with adjacent fixtures, which effectively softens the edge of the light. This overlap is the secret to achieving that smooth, professional glow seen in high-end architectural designs.
Keep in mind that your ceiling height plays a significant role in this calculation. As you increase the height of the room, you generally need to pull the fixtures slightly further out to maintain the same soft transition.
Understanding the Beam Spread Variable
The angle of the beam inside your recessed housing is just as important as the physical location. A narrow-beam bulb, such as a 15-degree spot, will create a much sharper shadow halo than a wide-flood lamp of 60 degrees or more.
If you have already installed your lights close to the wall, you can often mitigate the harshness by switching to a wider flood bulb. This simple change alters the geometry of the light output, turning a focused beam into a softer wash.
You should also look for fixtures that feature a “trim” or “baffle” designed to reduce glare. These components are specifically engineered to hide the light source from direct view while diffusing the output.
When the bulb is recessed deeper into the housing, the light is naturally softened before it even hits the wall surface. Combining a wide-beam bulb with a deep-recessed housing is the most effective way to eliminate those stubborn, distracting halos.
The Role of Ceiling Height
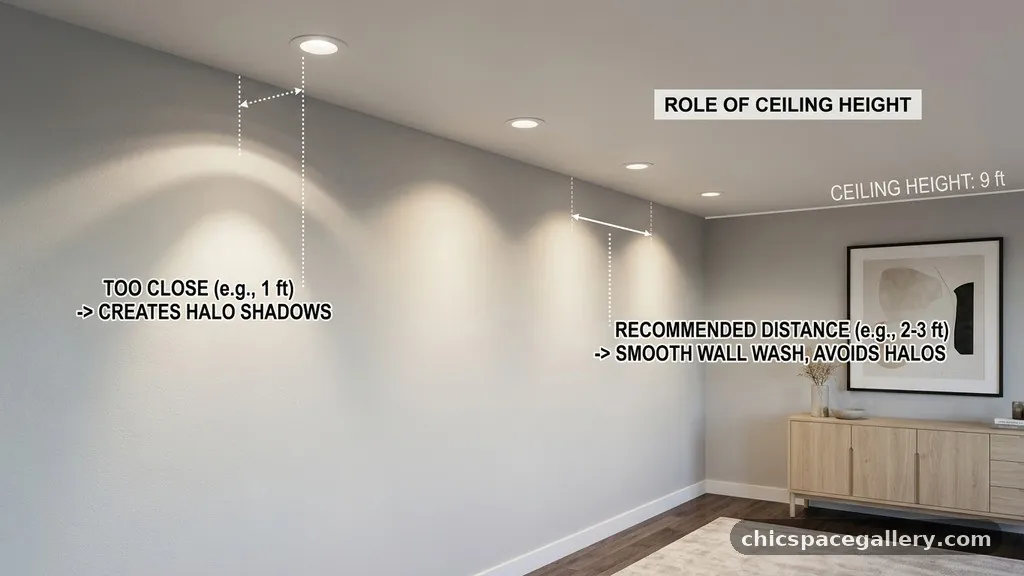
Ceiling height dictates the cone of light that hits your walls, and it is a factor that many homeowners overlook. In a standard 8-foot ceiling, the 24-inch rule works perfectly to avoid harsh shadow halos.
However, if your ceilings reach 10 or 12 feet, the light has more distance to travel, which naturally widens the beam diameter by the time it reaches the wall. You may find that with higher ceilings, you can afford to move the lights slightly closer to the wall without negative effects.
Conversely, in low-ceiling areas like basements, you must be more precise with your placement. A light source closer to the floor compresses the light cone, making any shadow halos appear more pronounced and jagged.
In these tighter spaces, err on the side of caution by keeping the fixtures at least 30 inches away from the wall. This extra buffer ensures that the light reaches the wall in a gentle, diffused manner rather than a harsh, focused splash.
Calculating Spacing for Wall Washing
If your goal is specifically to illuminate artwork or feature walls, you are looking for a technique known as “wall washing.” Wall washing requires a different approach than general ambient lighting because you want the light to travel down the wall smoothly.
To achieve this, you need to place the fixtures at a distance that matches their spacing from each other. For example, if your lights are 3 feet apart, they should also be roughly 3 feet from the wall.
This 1:1 ratio creates a continuous, even wash of light across the entire surface. When you achieve this balance, the individual shadow halos disappear, replaced by a uniform glow that makes the room feel larger.
You can learn more about the technical specifications of these lighting patterns through the Illuminating Engineering Society, which provides standards for residential and commercial lighting design. Using this proportional method ensures that your walls look clean and intentional rather than cluttered with random bright spots.
Comparing Light Placement Strategies
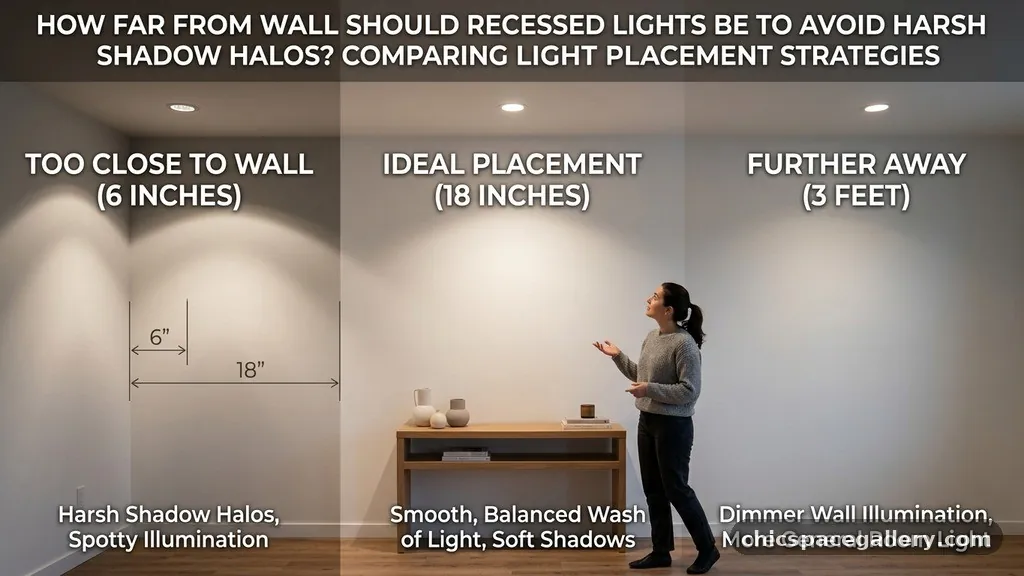
Different zones in your home require different approaches to light placement. The following table provides a quick reference for common scenarios where shadow control is critical.
| Application | Distance from Wall | Goal |
|---|---|---|
| General Ambient | 24–36 inches | Soft, even coverage |
| Wall Washing | 30–40 inches | Uniform surface glow |
| Accent Lighting | 18–24 inches | High-contrast focal point |
| Low Ceiling (8′) | 24–30 inches | Prevent harsh scallops |
Common Mistakes to Avoid
One of the most frequent errors is placing lights too close to the corners of a room. Corners are prone to double-bouncing light, which amplifies any existing shadow halos.
If you place a recessed light in the corner, ensure it is at least 3 feet away from both intersecting walls to prevent a cramped, uneven look. Another common mistake is ignoring the wall texture when planning your layout.
If you have a wall with significant texture, such as stone or brick, light will naturally create more shadows than on a smooth, painted surface. In these cases, you should increase the distance between the fixture and the wall to soften the grazing effect.
If you place lights too close to textured walls, the shadows will look exaggerated and messy. Always test your layout with a temporary light source before cutting holes in your finished ceiling.
Impact of Bulb Color and Intensity
The color temperature and lumen output of your bulbs also influence how we perceive shadows. Cooler, blue-toned light (above 4000K) tends to make shadows appear sharper and more clinical.
Warmer, yellow-toned light (around 2700K to 3000K) softens the transition between light and dark, making the room feel more comfortable. If you find your current lights produce harsh halos, switching to a warmer color temperature can visually minimize the contrast.
Intensity matters just as much as color. A high-lumen bulb will create a much brighter halo than a lower-lumen version, even if the placement is identical.
If you have dimmers installed, you can often “tune out” the harshness of a shadow halo by simply lowering the intensity. This is a great way to salvage a layout that might otherwise require moving the physical fixtures.
The Importance of Symmetry
Symmetry is the hallmark of a professional lighting design. Even if your spacing is technically correct, an asymmetrical layout will make shadow halos look like mistakes.
Ensure that your lights are aligned in a straight line parallel to the wall. Use a laser level to mark the center points on the ceiling before you begin any drilling.
When the fixtures are perfectly aligned, the overlapping light patterns create a harmonious visual effect. If one light is even two inches off, the resulting shadow halo will look different from the others, creating a visual “hiccup” on the wall. Take the time to measure from the wall to the center of each fixture to ensure absolute consistency across the entire ceiling plane.
Adjustable Gimbal Fixtures

Sometimes, the physical structure of your house makes it impossible to place lights at the perfect distance. In these situations, adjustable gimbal trims are a lifesaver.
These fixtures allow you to tilt the light head toward or away from the wall, effectively changing the angle of the beam without moving the housing. By angling the light slightly away from the wall, you can diffuse the edge of the halo and create a much smoother transition.
Gimbal fixtures are also excellent for highlighting specific decor or architectural details. If you have a piece of art on the wall, you can tilt the bulb to focus the light directly onto the canvas.
This keeps the light off the surrounding wall area, further reducing the chance of unwanted shadows. They provide a level of flexibility that standard, fixed-position recessed lights simply cannot match.
Planning for Future Flexibility
When you are in the planning phase, always consider how the room will be used in the future. Today’s home office might be tomorrow’s guest bedroom, and your lighting needs will change accordingly.
Installing a dimming system allows you to adjust the room’s mood and mitigate harsh lighting effects without needing to renovate. You should also consider using modular lighting systems that allow you to swap out trims or bulbs as your design preferences evolve.
Think about the furniture placement as well. If you know a tall bookshelf will sit against a certain wall, you should adjust your light placement to account for the obstruction.
A light placed directly over a tall piece of furniture will create a harsh, dark shadow behind it, which is the opposite of what you want. Planning for the “total room” instead of just the ceiling helps you avoid these long-term headaches.
Frequently Asked Questions
Can I use dimmers to fix bad shadow halos?
Yes, dimmers are highly effective at reducing the intensity of shadow halos. When you lower the light output, the high-contrast edge of the scallop becomes much less noticeable to the human eye. While this does not change the physical geometry of the light, it significantly improves the visual comfort of the space.
Is there a specific distance for 6-inch recessed lights?
The 6-inch fixture is a larger light source, which actually helps soften the edges of the beam compared to smaller 3-inch or 4-inch “canless” lights. Despite the size, the 24-to-36-inch rule still applies. Because the light source is wider, you may find you can get away with being slightly closer to the wall than you could with a tiny aperture fixture.
What if my ceiling is too low for standard spacing?
If your ceiling is lower than 8 feet, you should look for “shallow” or “wafer” style LED fixtures with a wide beam spread. These fixtures are designed to disperse light horizontally rather than focusing it downward, which helps eliminate harsh scallops. Always verify the beam angle on the product box, as a wide-flood lens is critical for low-ceiling applications.
Do wall colors affect the appearance of shadows?
Absolutely, the color and finish of your walls play a massive role. Matte, light-colored walls absorb and diffuse light, hiding shadow halos effectively. High-gloss or dark-colored walls reflect light differently, often making shadow artifacts appear more prominent and sharp. If you have dark or glossy walls, you must be even more precise with your placement to ensure the light hits the surface at a shallow, forgiving angle.
How do I know if my lights are too close before I cut the holes?
The best way to test is to use a portable, battery-powered work light or a temporary lamp to simulate the position. Hold the light at the intended distance from the wall and observe the shape of the beam. If the scallop looks sharp, jagged, or distracting, move the light further away until the transition becomes smooth and soft. This simple trial-and-error method will save you hours of frustration and unnecessary ceiling repairs.
Conclusion
Achieving the perfect balance of light in your home depends entirely on understanding how distance impacts the quality of your illumination. By keeping your fixtures between 24 and 36 inches from the wall, you create the necessary space for the light to spread and soften, effectively eliminating the harsh shadow halos that often make a room feel unfinished. Remember that factors like ceiling height, beam spread, and wall texture all play a role in how the final effect looks.
As you plan your next lighting project, take the time to measure carefully and consider the use of dimmers or adjustable trims to fine-tune the result. When you master how far from the wall should recessed lights be to avoid harsh shadow halos, you transform the space from a collection of bright spots into a cohesive, well-lit environment.
Start by testing your layout with a portable light source, and don’t be afraid to adjust your plans based on the unique geometry of your room. Your attention to these details will be evident in the final, polished appearance of your home.